
Upgrading your vehicle's suspension system often promises improved handling, comfort, and overall driving dynamics, but the journey doesn't always end with installation. Many enthusiasts and automotive professionals encounter unexpected issues after replacing control arms, ranging from unusual noises and vibration to alignment problems and premature wear. Understanding why these problems occur and how to systematically troubleshoot them is essential for anyone who has recently upgraded their suspension components. This comprehensive guide addresses the most common challenges that emerge after control arm installation and provides practical solutions rooted in real-world automotive service experience.

The control arms serve as critical connection points between your vehicle's chassis and wheel assembly, directly influencing steering response, tire contact with the road, and suspension geometry. When you upgrade these components, you're introducing new variables into a complex mechanical system that must work in perfect harmony. Even high-quality aftermarket control arms can present challenges if installation procedures aren't followed precisely, if complementary components weren't replaced simultaneously, or if the vehicle's existing suspension geometry has been compromised. Recognizing the symptoms, understanding their root causes, and applying targeted diagnostic techniques will help you resolve post-upgrade issues efficiently and restore your vehicle to optimal performance.
Understanding Post-Installation Symptoms and Their Root Causes
Identifying Noise-Related Issues After Control Arm Replacement
One of the most frequently reported problems after upgrading control arms involves unusual noises that weren't present before the installation. These sounds typically manifest as clunking, squeaking, or creaking noises during suspension travel, particularly when driving over bumps or during turning maneuvers. The root causes often trace back to improperly torqued fasteners, insufficient lubrication of bushings, or incompatibility between upgraded control arms and other suspension components. When control arms are installed, all mounting bolts must be tightened to manufacturer-specified torque values while the vehicle is at ride height with the suspension loaded, not while it's elevated on jack stands with the suspension hanging freely.
Another common noise-related issue stems from the bushing material used in upgraded control arms. Premium aftermarket units often feature polyurethane or solid bushings designed for performance applications, which transmit more road feedback than the original rubber bushings. While this characteristic enhances handling precision, it can also introduce new sounds as these firmer bushings allow less dampening of minor suspension movements. If the noise is a high-pitched squeak, it typically indicates insufficient lubrication between the bushing and its mounting sleeve. Many performance bushings require specific lubricants that are compatible with polyurethane compounds, and using incorrect greases can actually accelerate wear rather than prevent it.
Diagnosing Vibration and Steering Issues
Vibration problems following control arm upgrades often point to alignment discrepancies or imbalanced suspension geometry. When new control arms are installed, they can slightly alter the vehicle's camber, caster, and toe settings, even if they're designed as direct replacements for stock components. This geometric shift becomes particularly problematic if the alignment wasn't properly set after installation. A professional four-wheel alignment is not optional after replacing control arms—it's an essential final step that ensures all suspension angles work together correctly. Without proper alignment, you may experience vibration at highway speeds, uneven tire wear patterns, or a steering wheel that no longer centers properly.
Beyond alignment concerns, vibration can also result from improper installation of ball joints or inadequate tightening of mounting hardware. The ball joints integrated into many upgraded control arms must be properly seated in their tapers, and the castle nuts must be torqued to specification with new cotter pins installed. If a ball joint isn't fully seated or if the mounting hardware has any play, the resulting movement creates vibration that transmits through the steering system. Additionally, if you upgraded control arms without simultaneously replacing worn tie rod ends, sway bar links, or other interconnected components, the new parts may amplify existing weaknesses in the suspension system that were previously masked by the worn control arms.
Recognizing Premature Wear Patterns
Discovering premature wear on newly installed control arms can be particularly frustrating, but it almost always indicates an underlying issue that must be addressed. The most common culprit is continuing to drive on severely worn or damaged complementary components. When you install new control arms while leaving worn ball joints, tie rod ends, or strut mounts in place, those compromised parts force the new components to operate under abnormal stress loads. This situation is especially problematic because upgraded control arms with performance-oriented bushings transmit forces more directly, meaning any play or looseness in adjacent components gets amplified rather than absorbed.
Another frequent cause of premature wear involves environmental factors and protective coating damage. Many aftermarket control arms feature powder coating or specialized corrosion-resistant finishes that can be compromised during installation if proper care isn't taken. Scratches, chips, or gouges in these protective layers expose the underlying metal to moisture and road salt, accelerating corrosion. Similarly, if the control arms were installed without cleaning the mounting surfaces on the chassis, contamination between the components can create stress concentrations that promote fatigue cracking. Proper surface preparation, careful handling during installation, and application of appropriate anti-seize compounds on threaded fasteners all contribute to maximizing the service life of upgraded suspension components.
Systematic Diagnostic Approaches for Common Problems
Performing Physical Inspection and Component Testing
A comprehensive physical inspection forms the foundation of effective troubleshooting after upgrading control arms. Begin by raising the vehicle safely on jack stands and removing the wheels to gain clear access to all suspension components. With the wheels removed, visually inspect all mounting points where the control arms connect to the chassis and the steering knuckle. Look for any signs of movement, looseness, or improper seating of components. Pay particular attention to the bushing interfaces—the bushings should be centered in their mounting brackets without excessive gaps or compression. If polyurethane bushings were installed, check for proper lubrication by looking for a thin film of grease at the bushing edges where movement occurs.
Next, perform physical manipulation tests to identify sources of play or looseness. With the suspension unloaded, grasp the control arm near the ball joint and attempt to move it in multiple directions. Any detectable play indicates either an improperly tightened fastener or a defective component. Similarly, check the bushing mounting points by attempting to twist or pivot the control arm within its mounting bracket. While some minimal movement is normal with rubber bushings, there should be firm resistance with no clicking or clunking sounds. If the control arms feature grease fittings for the ball joints, verify that they're accessible and have been properly lubricated according to the manufacturer's specifications.
Using Alignment Data to Diagnose Geometry Issues
Professional alignment equipment provides invaluable diagnostic information when troubleshooting control arms after upgrading. A pre-alignment inspection should measure all four corners of the vehicle for camber, caster, toe, and ride height before any adjustments are made. These baseline measurements often reveal the underlying cause of problems. For example, if one corner shows significantly different camber compared to the opposite side despite identical control arm installation, it indicates either a bent component, improper installation, or chassis damage that wasn't apparent before the upgrade. Similarly, excessive positive or negative camber readings can explain accelerated inner or outer tire edge wear that appeared after the control arm replacement.
Caster angle discrepancies deserve particular attention because they directly affect steering feel and stability. Many aftermarket control arms, especially those with adjustable features, can alter the caster angle if not properly set during installation. If the alignment data shows caster angles outside the manufacturer's specifications or significant side-to-side differences, this explains steering pull, wandering behavior, or a steering wheel that doesn't self-center after turns. The alignment technician should also verify that the vehicle's ride height matches specifications at all four corners. If the suspension has sagged or if spring rates were changed during the upgrade, the altered ride height affects all suspension angles and can make it impossible to achieve proper alignment even with new control arms installed correctly.
Evaluating Load Distribution and Mounting Integrity
Proper load distribution through the suspension system is critical for control arms to function as designed. When evaluating potential problems, assess whether the forces acting on the control arms are being transmitted correctly through all mounting points. This evaluation begins with verifying that all mounting brackets and chassis connection points are structurally sound and undamaged. Rust, corrosion, or previous impact damage to the subframe or chassis rails can create weak points that prevent proper load transfer, causing the control arms to experience abnormal stress patterns even when correctly installed.
Testing mounting integrity involves both visual inspection and measurement verification. Use precision measuring tools to confirm that the distance between control arm mounting points matches the specifications for your vehicle. If previous repairs, accidents, or extensive corrosion have distorted the chassis geometry, the mounting points may no longer be in their correct positions, forcing the upgraded control arms to operate in a twisted or preloaded state. This condition creates constant stress even when the vehicle is stationary, dramatically reducing component life and causing handling problems that no amount of alignment adjustment can resolve. In cases where chassis distortion is detected, professional frame straightening or replacement of damaged structural components becomes necessary before the control arms can function properly.
Corrective Actions and Installation Best Practices
Proper Torque Procedures and Sequence
Correct torque procedures represent perhaps the most critical aspect of successful control arm installation, yet they're frequently overlooked or improperly executed. The fundamental principle that many installers miss is that suspension component fasteners must be torqued to specification while the vehicle is at normal ride height with the suspension loaded. This means all control arm mounting bolts should be brought to final torque only after the vehicle has been lowered from jack stands and is sitting on its wheels with the suspension supporting the vehicle's weight. Tightening these fasteners while the suspension hangs free places the bushings in a pre-twisted state, which causes internal stress, premature failure, and the development of squeaking or binding as the suspension moves through its travel range.
The proper torque sequence also matters significantly. Begin by hand-tightening all mounting hardware to ensure threads are properly engaged and components are correctly positioned. Then, if the control arms mount to the chassis at multiple points, tighten the rear mounting point first, followed by the forward mounting point, and finally the ball joint connection to the steering knuckle. This sequence allows the control arm to naturally find its correct position before being locked in place. Use a calibrated torque wrench for all final tightening operations, and never rely on impact tools for these critical fasteners. Many modern control arms include specific torque specifications that differ from original equipment values, so always reference the installation instructions provided with your upgraded components rather than assuming factory specifications apply.
Complementary Component Replacement Strategy
A strategic approach to complementary component replacement prevents many common problems that emerge after control arm upgrades. Professional suspension specialists recognize that control arms rarely fail in isolation—when one component has worn to the point of requiring replacement, other interconnected parts have typically experienced similar stress and degradation. Best practice involves replacing both lower control arms simultaneously rather than addressing just one side, as this maintains symmetrical suspension geometry and handling characteristics. Additionally, if your vehicle's control arms integrate ball joints and bushings, replacing both upper and lower control arms together ensures all pivot points have equal service life and performance characteristics.
Beyond the control arms themselves, several related components should be evaluated for replacement during the same service interval. Sway bar end links, outer tie rod ends, and inner tie rod assemblies all work in concert with control arms to manage suspension geometry and steering response. If these components show any signs of wear—including torn boots, loose connections, or excessive play—they should be replaced before installing upgraded control arms. Similarly, inspect strut mounts, spring insulators, and bump stops for deterioration. Worn strut mounts can introduce noise and vibration that mimics control arm problems, leading to misdiagnosis and unnecessary reinstallation work. Taking a comprehensive approach to suspension service maximizes the benefits of upgraded control arms and eliminates variables that could complicate troubleshooting efforts.
Post-Installation Verification and Break-In Period
Proper post-installation verification involves more than simply confirming that all bolts are tight. After completing the control arm upgrade and performing the alignment, conduct a thorough test drive that includes various operating conditions. Drive over speed bumps and uneven surfaces at low speeds while listening for any unusual noises. Perform steering maneuvers in both directions to verify smooth operation without binding or unusual resistance. At highway speeds, confirm that the vehicle tracks straight without pulling to either side and that the steering wheel remains centered. Pay attention to how the vehicle responds during braking, particularly whether it pulls to one side or exhibits any unusual vibration through the brake pedal or steering wheel.
Many upgraded control arms, particularly those with performance-oriented bushings, require a break-in period before they achieve optimal performance characteristics. During the first few hundred miles after installation, the bushings conform to their mounting surfaces and the various components settle into their operational positions. Some initial squeaking or minor noise is not unusual during this period, especially with polyurethane bushings, and often resolves as the components wear-in. However, continue monitoring for any changes in symptoms or the emergence of new issues. Schedule a follow-up inspection and alignment verification after approximately 500 miles of driving to ensure that all fasteners remain properly torqued and that the suspension geometry hasn't shifted as the components have settled. This follow-up check catches any issues before they result in premature wear or performance degradation.
Advanced Troubleshooting for Persistent Issues
Addressing Compatibility Problems Between Components
Compatibility issues between upgraded control arms and other suspension components can create persistent problems that resist conventional troubleshooting approaches. These situations often arise when mixing components from different manufacturers or when upgrading to performance-oriented parts while retaining stock components elsewhere in the suspension system. For example, installing control arms designed for lowered vehicles on a car with stock ride height can result in extreme suspension angles that cause binding, accelerated wear, and poor handling. Similarly, performance control arms with solid or polyurethane bushings may not work harmoniously with soft, comfort-oriented springs and dampers, creating a mismatch in suspension dynamics that produces unexpected behavior.
Identifying compatibility problems requires careful evaluation of the entire suspension system as an integrated unit rather than as individual components. Review the specifications and intended applications for all suspension parts currently installed on your vehicle. If you've installed control arms marketed for aggressive track use but retained stock struts and springs, the performance mismatch may explain handling problems or unusual wear patterns. Consult with suspension specialists or the component manufacturers to verify that your combination of parts is appropriate for your intended use and vehicle configuration. In some cases, achieving optimal results may require additional upgrades to other suspension components to create a balanced system where all parts work together effectively.
Investigating Chassis and Structural Concerns
When control arm problems persist despite correct installation, proper torque, and professional alignment, the underlying cause often lies in chassis or structural issues that compromise the foundation upon which the suspension components mount. This situation is particularly common in older vehicles or those that have been involved in accidents. Corrosion can weaken subframe mounting points, allowing flex and movement that prevents control arms from maintaining proper geometry. Even minor collision damage that didn't seem significant at the time can distort chassis rails or suspension mounting points by amounts small enough to be invisible yet large enough to cause serious suspension problems.
Investigating structural concerns requires more advanced diagnostic techniques than typical suspension troubleshooting. Professional frame measurement equipment can identify chassis distortion that explains why control arms don't align properly or why suspension geometry falls outside specification despite correct component installation. Look for evidence of previous repair work, particularly poorly executed welding or incorrect fastener replacement that might have compromised structural integrity. In vehicles with separate subframes, inspect all subframe mounting points and bushings for deterioration. Collapsed or torn subframe bushings allow the entire front or rear suspension assembly to shift position relative to the chassis, making proper alignment impossible and subjecting control arms to constant stress from the misalignment. Addressing these foundational issues, though potentially expensive, is essential before upgraded control arms can deliver their intended performance benefits.
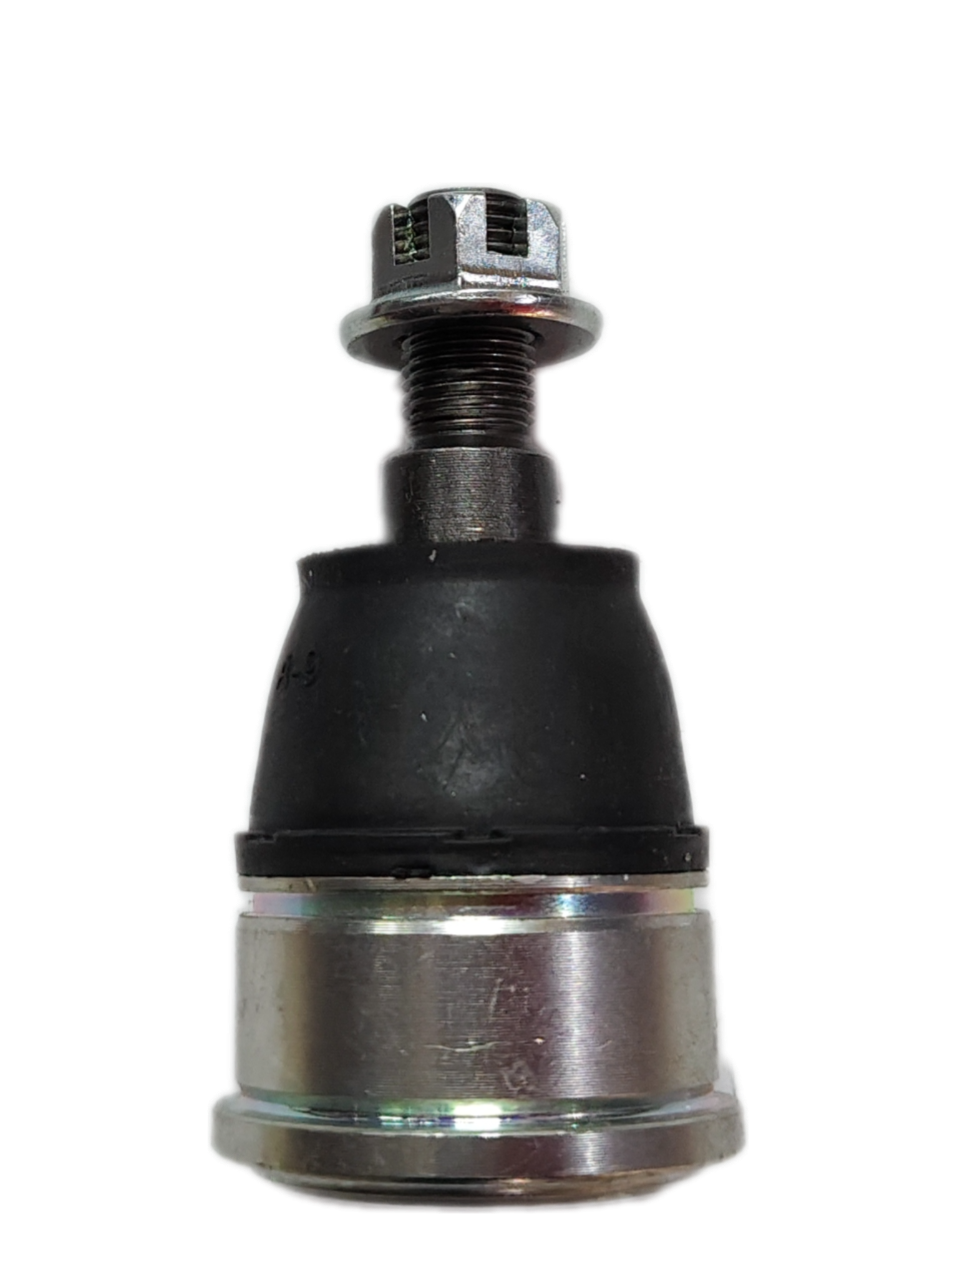
Resolving Ball Joint and Bearing Interface Problems
Many modern control arms integrate ball joints as permanent components rather than serviceable parts, and problems with these ball joint interfaces represent a significant troubleshooting challenge. After upgrading, issues can arise from improper seating of the ball joint taper in the steering knuckle, inadequate tightening of the retaining hardware, or damage to the tapered surfaces during installation. The ball joint taper must seat completely and uniformly into the matching taper in the knuckle for the joint to function correctly. If any contamination, corrosion, or damage exists on either surface, proper seating becomes impossible, resulting in play, looseness, and potential separation under load.
Resolving ball joint interface problems often requires removal and careful inspection of all mating surfaces. Clean the tapered bore in the steering knuckle thoroughly with a wire brush and solvent to remove any rust, scale, or debris. Inspect the taper carefully for wear, scoring, or damage that might prevent proper seating. Similarly, examine the ball joint stud taper for any signs of damage from previous removal or installation attempts. When reinstalling, apply a thin film of clean oil to the tapered surfaces to aid seating—never use anti-seize compound or grease on tapers, as these lubricants can prevent proper seating and cause looseness. Torque the ball joint retaining nut to specification and verify that the taper has seated correctly by checking that the ball joint boot sits at the correct height relative to the knuckle. If problems persist despite proper cleaning and installation technique, the steering knuckle itself may be damaged and require replacement to achieve reliable control arm function.
FAQ
How long should I wait before getting an alignment after installing new control arms?
You should get a professional alignment immediately after installing new control arms, not wait at all. The alignment is an essential final step of the installation process, not an optional service you can delay. Installing control arms changes your vehicle's suspension geometry, and driving even short distances without proper alignment can cause rapid tire wear, handling problems, and stress on the new components. Schedule the alignment appointment before beginning the installation work so you can drive directly to the alignment shop after completing the control arm replacement. If circumstances require you to drive the vehicle before alignment is possible, limit your driving to very low speeds and short distances, and avoid highway travel or aggressive maneuvering.
Why do my new control arms make noise when my old ones were quiet?
Noise from new control arms typically results from either installation errors or the different bushing materials used in upgraded components. If you installed performance control arms with polyurethane or solid bushings to replace original rubber bushings, some additional noise transmission is normal and expected—these firmer bushings reduce deflection for improved handling but transmit more road feedback and minor sounds. However, if the noise is significant clunking or squeaking, it usually indicates improper torque procedures, specifically that mounting bolts were tightened while the suspension was hanging rather than at ride height. Squeaking from polyurethane bushings often means insufficient lubrication with the correct type of grease compatible with the bushing material. Clunking sounds suggest loose hardware, improperly seated components, or worn adjacent parts like sway bar links or strut mounts that the new control arms have revealed.
Can I install just one control arm or do I need to replace both sides?
While it's technically possible to replace just one control arm if only one side is damaged, best practice strongly recommends replacing both control arms on the same axle simultaneously. When one control arm has worn enough to require replacement, the opposite side has experienced similar mileage and stress, meaning it's approaching the end of its service life as well. Installing just one new control arm creates an asymmetric suspension system where one side has fresh bushings and ball joints while the other has worn components, resulting in uneven handling characteristics, difficulty achieving proper alignment, and the likelihood that you'll need to replace the second side shortly anyway. The additional labor cost of replacing both sides simultaneously is minimal since the vehicle is already disassembled, making paired replacement the most cost-effective approach in terms of both parts longevity and labor efficiency.
What should I do if my steering wheel isn't centered after control arm replacement?
An off-center steering wheel after control arm replacement indicates that your vehicle's alignment, specifically the toe settings, needs adjustment. This is completely normal and expected—replacing control arms almost always requires realignment because the installation process can slightly alter suspension geometry even when components are correctly installed. Do not attempt to center the steering wheel by adjusting the tie rods yourself without proper alignment equipment, as this approach adjusts toe on one side only and creates uneven steering response and tire wear. Instead, take your vehicle to a professional alignment shop where technicians can measure all suspension angles and adjust toe equally on both sides while ensuring the steering wheel is centered. If the steering wheel remains off-center even after professional alignment, it may indicate that the steering rack wasn't properly centered before the alignment was performed, requiring the alignment to be redone with the rack properly positioned.
Table of Contents
- Understanding Post-Installation Symptoms and Their Root Causes
- Systematic Diagnostic Approaches for Common Problems
- Corrective Actions and Installation Best Practices
- Advanced Troubleshooting for Persistent Issues
-
FAQ
- How long should I wait before getting an alignment after installing new control arms?
- Why do my new control arms make noise when my old ones were quiet?
- Can I install just one control arm or do I need to replace both sides?
- What should I do if my steering wheel isn't centered after control arm replacement?